40 iic pin labels in arduino mega are
Amazon.com: SoluIic/i2c/twi Serial 2004 20x4 LCD Module Shield for ... This item: SoluIic/i2c/twi Serial 2004 20x4 LCD Module Shield for Arduino UNO Mega R3, White on Blue /LCD Module for Arduino 20 X 4, PCB Board, White on Blue $9.59 Only 3 left in stock - order soon. Using I2C SSD1306 OLED Display With Arduino - Electronics-Lab Unzip the two libraries and add them to the Arduino libraries folder, then run Arduino IDE and open the I2C exapmle from OLED library. The only change you have to do is to change the I2C address of the display. Go to the setup function, and change the value on the display.begin function call from 0x3D to 0x3C.
Interfacing Arduino with BMP280 pressure and temperature sensor VCC is the supply pin which is connected to Arduino 5V pin SDA is I2C bus serial data line, connected to Arduino analog pin 4 (A4) SCL is I2C bus serial clock line, connected to Arduino analog pin 5 (A5). The 1602 LCD screen is used to display temperature and pressure values where: RS —> Arduino digital pin 2 E —> Arduino digital pin 3

Iic pin labels in arduino mega are
Wire - Arduino Reference Description This library allows you to communicate with I2C/TWI devices. On the Arduino boards with the R3 layout (1.0 pinout), the SDA (data line) and SCL (clock line) are on the pin headers close to the AREF pin. The Arduino Due has two I2C/TWI interfaces SDA1 and SCL1 are near to the AREF pin and the additional one is on pins 20 and 21. ESP8266 Pinout Reference: Which GPIO pins should you use? The following table shows the correspondence between the labels on the silkscreen and the GPIO number as well as what pins are the best to use in your projects, and which ones you need to be cautious. ... GPIO0 to GPIO15. PWM signals on ESP8266 have 10-bit resolution. Learn how to use ESP8266 PWM pins: ESP8266 PWM with Arduino IDE; ESP8266 PWM ... I2C Tutorial for Arduino, ESP8266 and ESP32 - DIYI0T Arduino Mega. SDA: PIN20 SCL: PIN21 (no label on the PCB front, only visible from the side) The two pins which you need for the I2C communication are the following: ... If you like to know how you can reduce the number of input pins for a keypad from 8 to only 2 I2C pins, with the help of the I2C multiplexer, then visit the keypad tutorial for ...
Iic pin labels in arduino mega are. arduino mega - Confused between SPI and I2C for SSD1306 OLED - Arduino ... Confused between SPI and I2C for SSD1306 OLED. I haven't been able to successfully wire it to an Arduino (Mega 2560) however. I have been reading up on I2C and SPI and checked some libraries from Adafruit and U8G2. However, I'm confused, since most of the Internet is talking about a similar OLED display with GND - VDD - SCL - SDA labelled pins ... Arduino Nano Pinout, Specifications, Features, Datasheet & Programming To get it started with Arduino Uno board and blink the built-in LED, load the example code by selecting Files>Examples>Basics>Blink. Once the example code (also shown below) is loaded into your IDE, click on the 'upload' button given on the top bar. Once the upload is finished, you should see the Arduino's built-in LED blinking. I2C Communications Part 1 - Arduino to Arduino | DroneBot Workshop Use the two analog pins, A4 and A5, as shown in the table above. I2C Between 2 Arduino's For our first experiment we will hoo two Arduinos together and exchange data between them. One Arduino will be the master, the other will be the slave. I'm using two Arduino Unos, but you can substitute other Arduino's if you don't have two Unos. Arduino Mega Pinout Diagram - Use Arduino for Projects Arduino Mega Introduction: The Arduino Mega is a microcontroller board based on the ATmega1280 (datasheet). It has 54 digital input/output pins (of which 14 can be used as PWM outputs), 16 analog inputs, 4 UARTs (hardware serial ports), a 16 MHz crystal oscillator, a USB connection, a power jack, an ICSP header, and a reset button.
Using a 20×4 I2C Character LCD display with Arduino Uno For the Arduino Uno, the I2C pins are located on Pin A5 (SCL) and A4 (SDA). This may differ on any of the other Arduino boards. Connect the components as shown in the schematics below; Schematics To make the connections, even more easier to follow, the pin connections of the components is described below. Arduino - LCD arduino-info - LCD-Blue-I2C This unit connects with 4 wires including Vcc and Gnd. It is easiest with a 4-wire cable (supplied) that plugs into the Sensor Shield communications connector. On most Arduino boards, SDA (data line) is on analog input pin 4, and SCL (clock line) is on analog input pin 5. On the Arduino Mega, SDA is digital pin 20 and SCL is 21. ELECHOUSE PN532 NFC RFID Module User Guide - Manuals+ Here we show how to read and write RFID cards with this module. Download the library PN532 at our Github page. You could find 4 folders in the library. Unzip the 4 folders at the library folder in Arduino IDE. Start Arduino IDE and choose the example: Modify the code to choose the right mode: Upload the code to Arduino and open the Serial monitor. Ultimate Guide to Arduino Mega 2560 Pinout, Specs & Schematic Arduino Mega 2560 has 54 digital input/output pins, where 16 pins are analog inputs, 14 are PWM pins, and 6 are hardware serial ports (UARTs). It has a crystal oscillator-16 MHz, a power jack, an ICSP header, a USB-B port, and a RESET button. Arduino Mega Pinout. Voltage Regulator -The voltage regulator converts the input voltage to 5V.
Arduino and the SSD1306 OLED I2C 128x64 Display - Instructables If you are not using an Arduino UNO the SDA and SCL connections might be on different pins. On a MEGA or Leonardo SDA goes to pin 20 and SCL to pin 21. Take care as some SSD1306 boards have their pins in a different order - use the labels not the relative positions. Add Tip Ask Question Comment Download Step 2: Check the I2C Address Amazon.com: KEYESTUDIO Mega Plus 2560 R3 Board for Arduino with Type-C ... Make sure this fits by entering your model number.; This Mega Plus board can work like the Arduino Mega R3 2560 but it is more powerful and has more pins ; The USB-to-Serial chip of this board is stable and compatible CP2102; USB connector of it is Type C USB Port; Up to 5V, 1.5A output, can drive drive high-current devices like servo and motor ZALAGA 0.96 Inch White LCD Screen 4-Pin I2C IIC Communication 4-Pin ... Computer Cables & Connectors / All Computer Cables & Connectors ZALAGA ZALAGA 0.96 Inch White LCD Screen 4-Pin I2C IIC Communication 4-Pin 128X64 OLED Self-Luminous Display for Arduino MSP430 Series $31.42 $47.13 Add to cart Free shipping, arrives by Thu, Jul 28 to Want it faster? Add an address to see options More options Arduino-board/KS0498.md at main · keyestudio/Arduino-board Contribute to keyestudio/Arduino-board development by creating an account on GitHub.
Simple Labs' Quick Start Kit for Arduino: Simple Labs' Quick Start Kit for Arduino - 7-Segment ...
Character I2C LCD with Arduino Tutorial (8 Examples) This library comes pre-installed with the Arduino IDE. To install this library, go to Tools > Manage Libraries (Ctrl + Shift + I on Windows) in the Arduino IDE. The Library Manager will open and update the list of installed libraries. Now search for 'liquidcrystal_i2c' and look for the library by Frank de Brabander.
![4. Arduino Technical Details - Arduino: A Technical Reference [Book]](https://www.oreilly.com/library/view/arduino-a-technical/9781491934319/assets/aian_0420.png)
4. Arduino Technical Details - Arduino: A Technical Reference [Book]
Arduino Mega Tutorial - Pinout and Schematics. Mega 2560 Specifications It is also compatible with the different type of boards like high-level signal (5V) or low-level signal (3.3V) with I/O ref pin. Brownout and watchdog help to make the system more reliable and robust. It supports ICSP as well as USB microcontroller programming with PC. The Arduino Mega 2560 is a replacement of the old Arduino Mega, and so in ...

Simple Labs' Quick Start Kit for Arduino: Simple Labs' Quick Start Kit for Arduino - 7-Segment ...
Interface I2C 16x2 LCD with Arduino Uno (Just 4 wires) After soldering connect the I2C Module to Arduino Uno. Arduino Uno I2C module. Analog Pin 4 - SDA. Analog pin 5 - SCL. 5V - Vcc. GND - GND. Connect the Arduino to computer. Next open Serial monitor from the icon on top right corner of Arduino IDE. And set the baud rate as 9600. Please ensure the correct port.
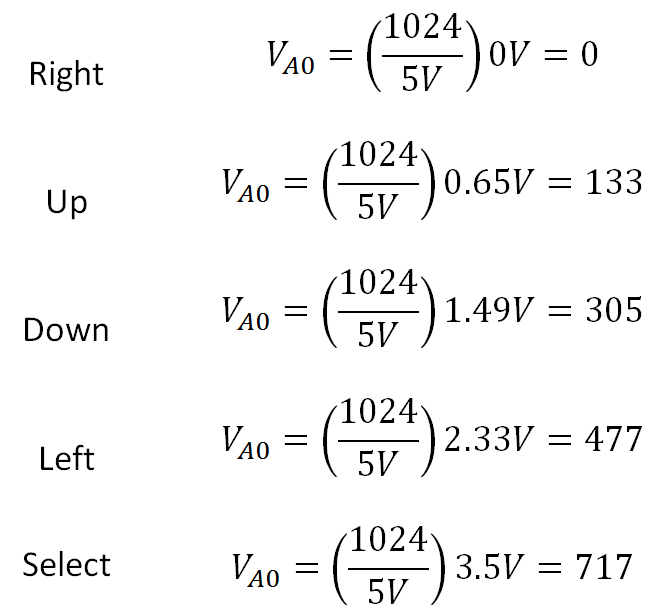
LCD Keypad Shield for Arduino - IC Station Product Review - The RC Tractor Guy
Arduino - OLED | Arduino Tutorial How To Use OLED with Arduino Install SSD1306 OLED library On Arduino IDE, Go to Tools Manage Libraries Search "SSD1306", then find the SSD1306 library by Adafruit Click Install button to install the library. You will be asked for intalling some other library dependencies Click Install All button to install all library dependencies. Program for OLED

Simple Labs' Quick Start Kit for Arduino: Simple Labs' Quick Start Kit for Arduino - Getting ...
I2C/IIC/TWI - Pearltrees If you are using an Arduino Mega, SDA is pin 20 and SCL is 21, so note that shields with I2C need to be specifically for the Mega. ChipKIT Tutorial 6: Inter-Integrated Circuit (I2C) communication. I2C or IIC (Inter-Integrated Circuit) is a simple bidirectional serial interface, which requires only 2 signal lines for data transfer.

My Commentary and Technical help: Signature Electronic Sign to Arduino Part 3
Electronics Hub - Tech Reviews | Guides & How-to | Latest Trends Electronics Hub - Tech Reviews | Guides & How-to | Latest Trends

Piano HAT – der ultimative Mini musikalische Begleiter für Raspberry Pi! – MocSad
1602 LCD Keypad Shield Module With I2C Backpack - Instructables Holding the serial module with the I2C interface at the left hand end, there are 16 pins at the lower edge. The first of these is ground, and the second of these is +5v. Another option is to use the lower two pins on the I2C interface for power, but I found it more convenient to use the pins as described above. I2C interface.
*Note thatthe ADC pins can be configured and used for DIO if required.
Two Arduino Mega 2560 I2C - Programming Questions - Arduino Forum There is a trace on the Arduino board connecting the pins on the chip to labeled locations around the periphery of the board. The labels around the periphery correspond to what the code expects to have stuff connected to. system January 30, 2015, 12:12pm #3

Solder it! | Adafruit Proto Shield for Arduino | Adafruit Learning System
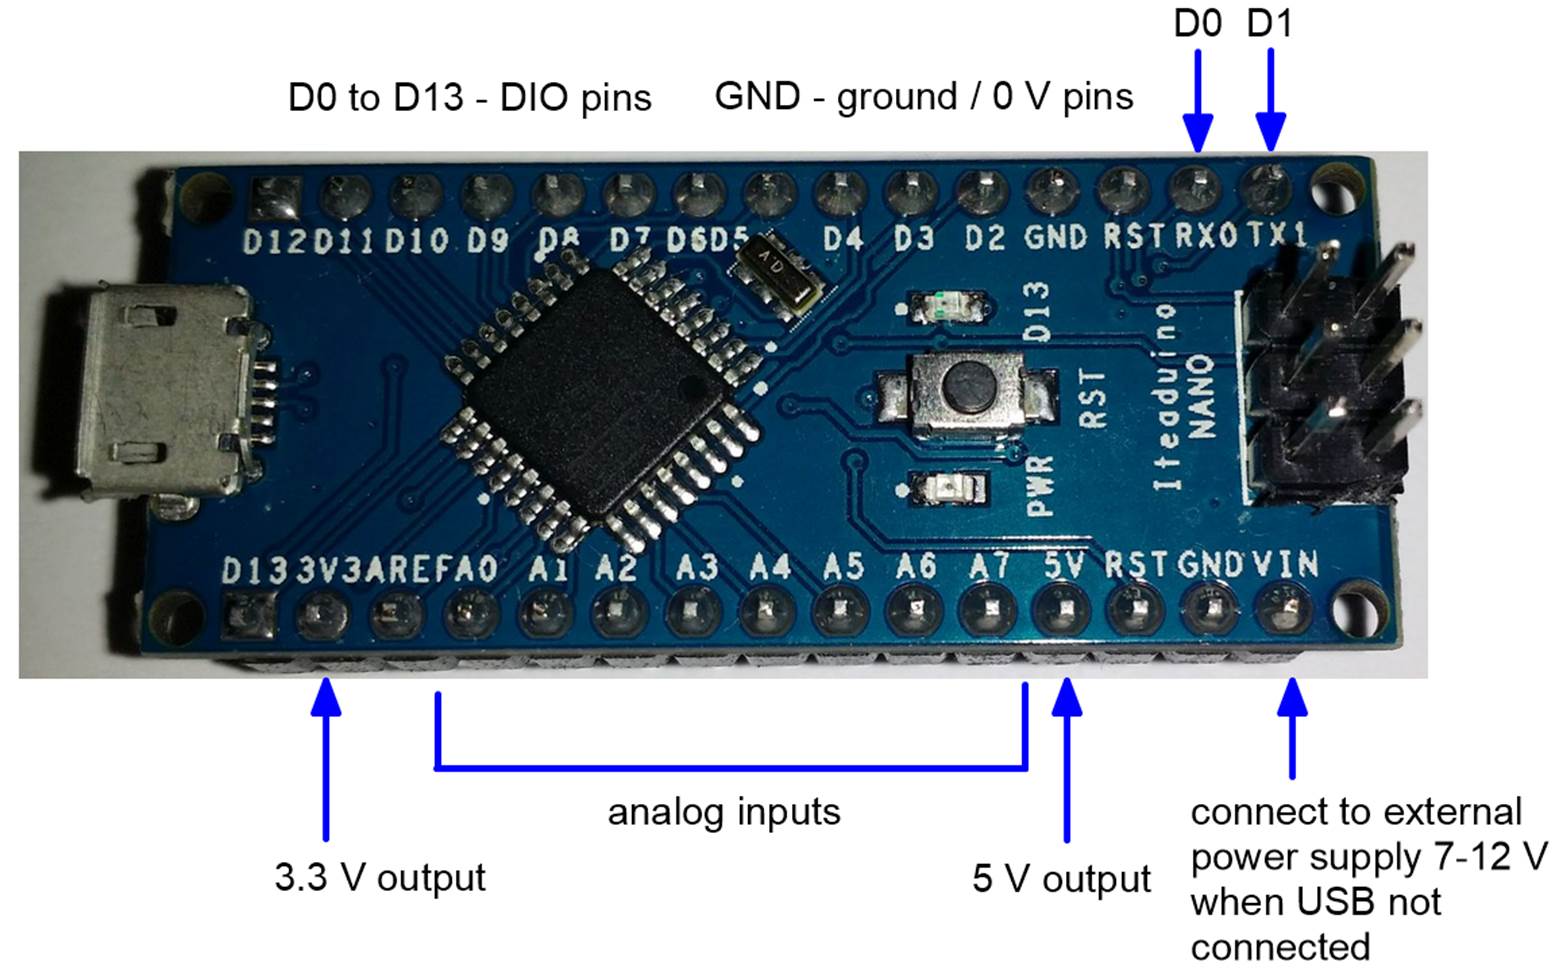
Arduino Nano: Pinout, Wiring Diagram and Programming Arduino Nano Pinout Description Arduino Nano Pinout contains 14 digital pins, 8 analog pins, 2 reset pins and 6 power pins. Specific functions are assigned to each of the pin, as shown in the table below. Note: Analogue pins can function as an analogue to digital converter and A4 and A5 pins can be used for I2C communication.
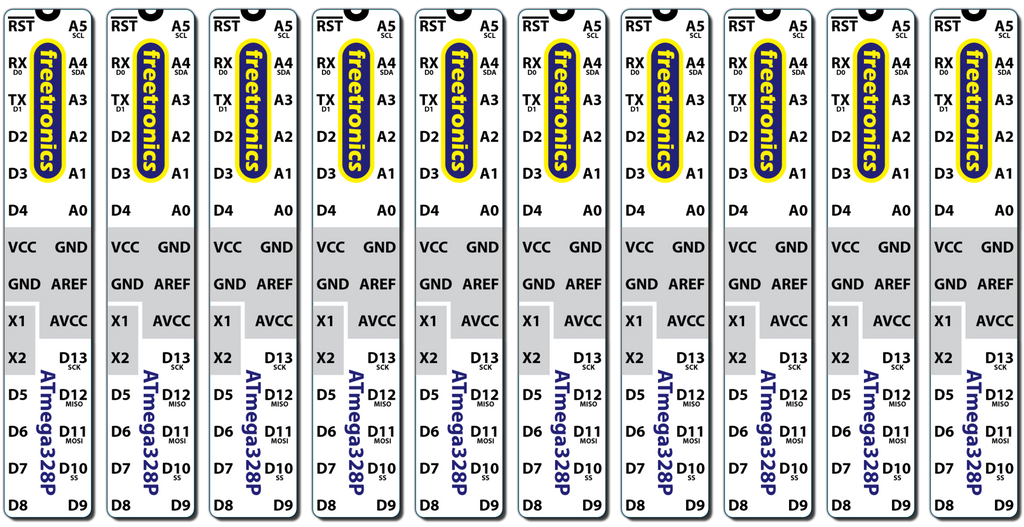
Microcontroller Labels - Arduino pinout | Freetronics
SPI - Arduino Reference This library allows you to communicate with SPI devices, with the Arduino as the controller device. This library is bundled with every Arduino platform (avr, megaavr, mbed, samd, sam, arc32), so you do not need to install the library separately. To read more about Arduino and SPI, you can visit the Arduino & Serial Peripheral Interface (SPI) guide.
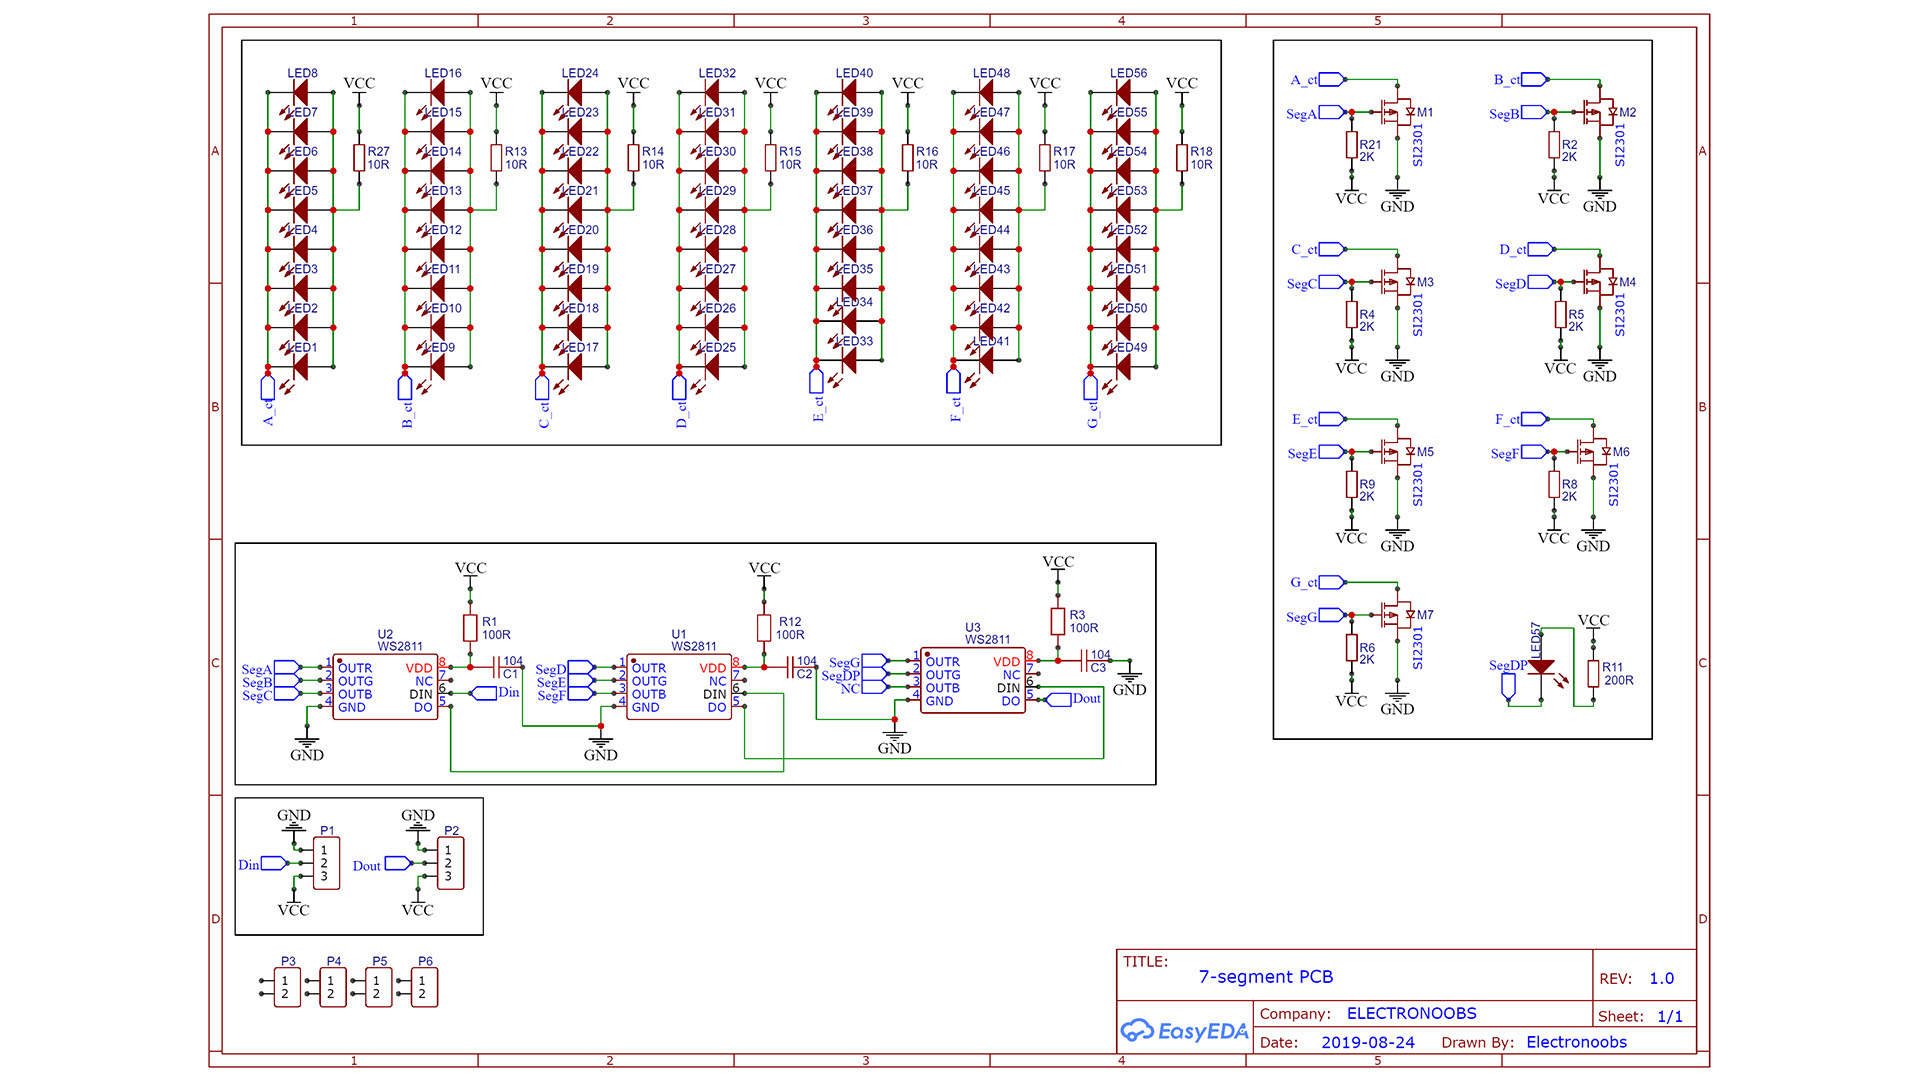
7 segement display homemade big huge addressable Arduino
I2C Tutorial for Arduino, ESP8266 and ESP32 - DIYI0T Arduino Mega. SDA: PIN20 SCL: PIN21 (no label on the PCB front, only visible from the side) The two pins which you need for the I2C communication are the following: ... If you like to know how you can reduce the number of input pins for a keypad from 8 to only 2 I2C pins, with the help of the I2C multiplexer, then visit the keypad tutorial for ...
Post a Comment for "40 iic pin labels in arduino mega are"